Luminaria with Electric Base
This project describes how to make a luminaria with an electric base.
This project is rated: DIFFICULT
Materials needed:
- Computer paper or card stock
- Wood for base
- Light socket and bulb
- Wire and plug
- Glue
- Crayons, colored pencils, or markers
Project Instructions
- Print two copies of either the plain pattern or the pre-colored pattern if you have a color printer.
- Color the plain pattern to suit yourself.
- If you printed the color pattern, trim off the unprinted left edge of each copy.
- Glue one copy to the other copy, overlapping the uncolored part of one of the images.
- Fold the uncolored parts, at the top and bottom, toward the back.
- Glue these folded parts to the back of your printout. (This gives some stiffening to the edges of your luminaria.)
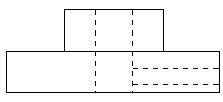
- You need a base to hold the light and to support the paper cylinder. The width of the printout is needed to determine the diameter of the base. Measure the width of the combined images (do not include the part that will be overlapped) and divide that value by 3.14 to get the diameter that you will need for the base. (In our prototype, the diameter turned out to be 4.9 inches.) Use a 1 inch (actual 3/4″) thick board and cut out a circle with a the diameter you calculated. Drill a 0.75 inch hole in the center, and drill a 5/16 inch hole from the outside edge to the center hole (this is for your electric wire.) Cut a smaller circular piece (about 2 inch diameter,) drill a 0.75 inch hole in it and mount it on the larger piece. You may fasten the pieces together with glue or screws. A cross section of the finished base will look something like the drawing at below right.
- You will need a 110 volt light socket (or a similar socket.) Glue the socket in the center hole of the base. Wire the socket with the wire running through the horizontal hole; and affix a plug on the end of your cord. (Alternatively, a battery socket with LED bulb could be used.)
- Wrap and glue the printout around the base with the bottom of the printout aligned with the bottom of the base.
- Overlap the right edge of the printout with the left edge of the printout and glue.
(Note: You will need to make an opening in the paper where the cord goes into the base.)
When the glue dries, you have a completed luminaria! Put a bulb in the socket and plug it in. It will provide a soft light in your room while you watch TV.
MAKE SURE THAT THE ELECTRIC BULB CAN NEVER TOUCH THE PAPER!!


