After building a loom, there are certain things that you need to buy or make. You need heddles; how to make string heddles is shown on another page. You also need a reed to put into your beater.
The beater is a device that is used to pack weft threads into the warp. The beater holds a reed. A reed consists of vertical members (usually made of metal). These vertical members are separated from each other by spacers to create slots. The warp threads pass through the slots (these slots are called dents.) A weft thread is passed through an open shed between the reed and the cloth. The shed is closed and the beater is used to strike the weft thread and force it against the cloth that is being generated.
Reeds may be purchased. They are available in different lengths and with different numbers of dents per inch. A 10 dent reed means that it has 10 dents to the inch. Common spacing of dents are 10, 12, and 15. Normally, only one warp thread is passed through each dent. However, some fabrics require a number of threads per inch which do not match the number of dents per inch of your reed. It is possible and practical to use a threading scheme that involves more than one thread per dent. For example, if you sleigh (thread) your reed so that the threading through the dents has a pattern of 1, 2, 1, 2, 1, 2, .... , in a 15 dent reed, this will give you about 22 threads per inch.
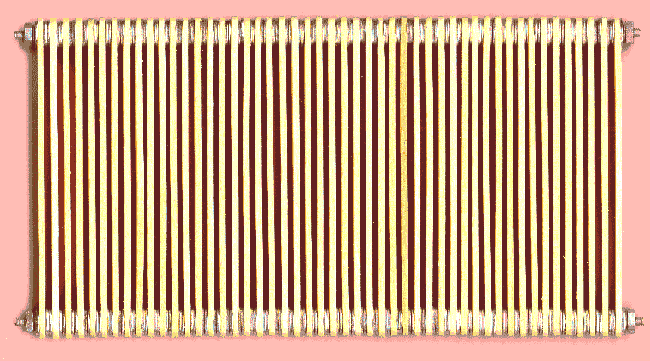
You may not find it convenient to purchase a reed for your loom. Therefore, this page describes how to make a reed. Below is a picture of a reed that has been constructed using the directions that follow.

This reed has been made using craft sticks (popsicle) for the vertical members.
1. Threaded rod in 3 foot lengths can be purchased at a hardware store. In the example, 6-32 threaded rod was used.
2. Cut two pieces of rod to a length that you want your reed to be plus about one-half inch. In the example, the rods are each 8.5 inches in length.
3. You must then determine how many craft sticks will be used. In the example, there are 49.
4. At each end of each craft stick, drill a hole that the rod will pass through. In the example, a 5/32 inch drill bit was used.
5. You are now ready to assemble your reed. Place a flat washer (and optionally a lock washer) and a nut on the end of each rod.
6. Place a craft stick on to both rods, sliding it down against the flat washers.
7. Place a spacer(s) on each rod. In the example, two number 6 washers were used as a spacer. The spacer can be any suitable material such as a piece of craft stick with a hole in it. The thickness of the spacer plus the thickness of the craft stick will determine the dent spacing.
8. Place another craft stick on the rods.
9. Repeat steps 7 and 8 until you have installed all of your craft sticks.
10. Place a flat washer (and optionally a lock washer) and a nut on the end of each rod.
11. Tighten the nuts.
Your reed is now complete. You can now place it in your beater.
The example reed has approximately 6 dents per inch. If you use only one washer in each dent, you will get about an 8 dent reed; however, the open space is very narrow. You may be able to find narrower material to use for the vertical members such as thin and narrow metal strips. The same procedure may be used with other materials, but drilling the holes may be more difficult. In commercially made reeds, the vertical members are thin, narrow strips of metal. At the top and bottom, two strips of wood are placed on either side of the metal strips. Then a heavy cord is wound around the wood and between the metal strips. The cord not only holds the reed together, its thickness determines the dent spacing. By using cords of different thicknesses, different spacing may be achieved.
Return to Two Harness Loom page.