This project is rated as DIFFICULT.
Materials needed: Computer paper, cloth (preferably 3 different colors), thread, hand sewing needle, two buttons, scissors, sewing machine, iron, polyester (or other) stuffing, (optionally: embroidery floss, yarn, marker, 3rd button.)
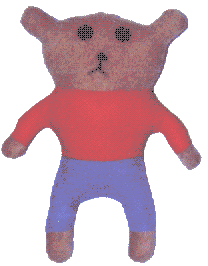
In this project, you will make a stuffed Teddy Bear with clothing. He will look something like the picture below:
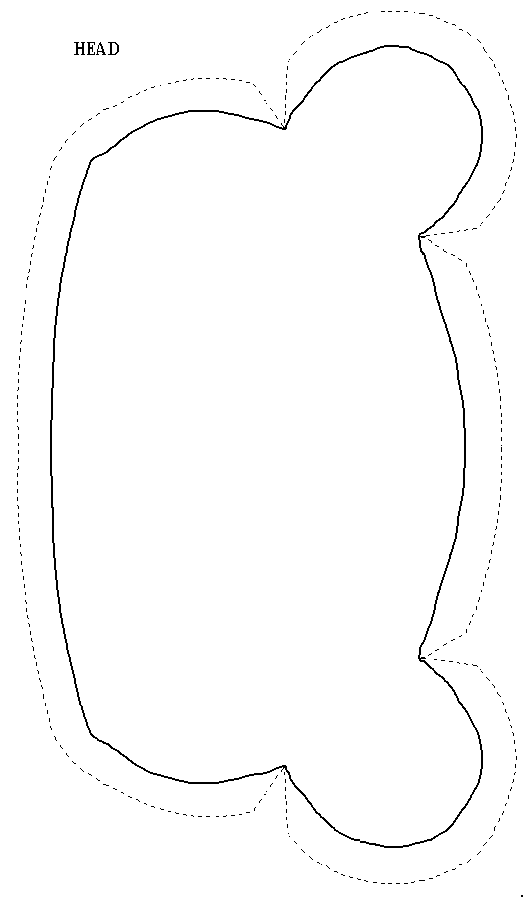
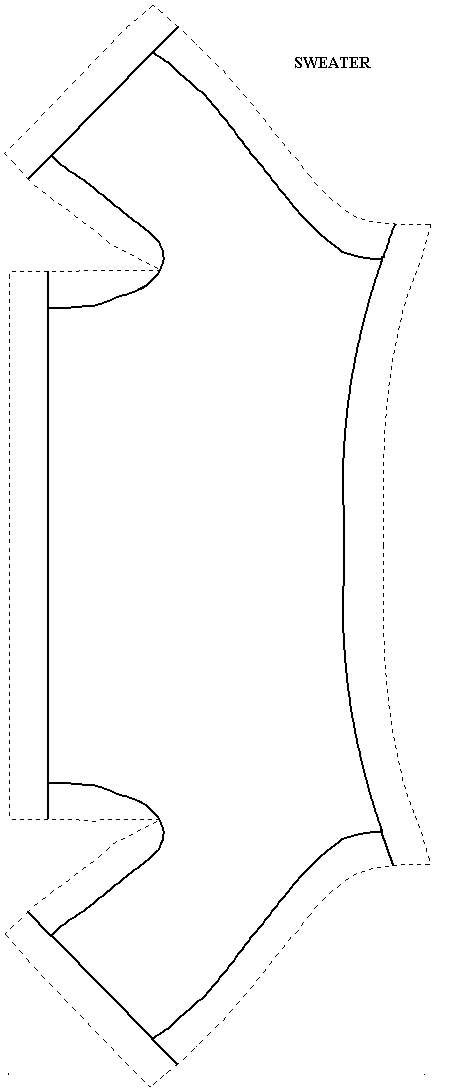
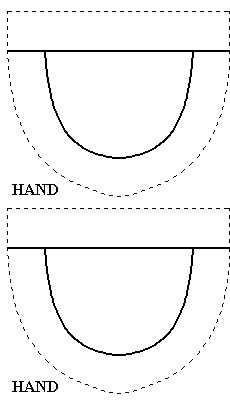
1. Print out the pattern pieces. There are 5 of them.
(Note: If you are using a MacIntosh computer, the images will print out too large. You will need to copy each pattern piece; and print it from a graphics program in a suitable size.)
Print the head pattern.
In order to get the sweater pattern onto one sheet of paper, use legal size paper in your printer. You can print the sweater pattern on letter size paper but it will print on two sheets and the two parts of the pattern will have to be joined together to get a single pattern piece.
Print the sweater pattern.
Print the two hands pattern.
Print the pants pattern.
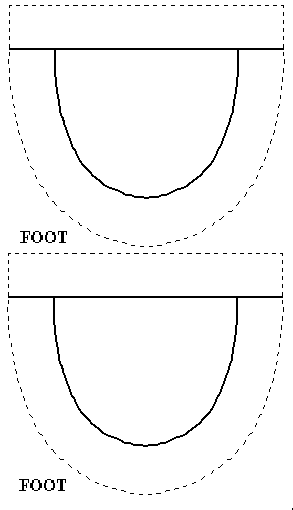
Print the two feet pattern.
2. Cut out each pattern piece, along the dashed lines.
3. Select a fabric that is a suitable color (brown, black, or white) for the head, hands, and feet. You will need two pieces that are each about 10 by 10 inches.
Place the two pieces of fabric right sides together.
Pin the patterns of the head, two hands, and two feet to the two pieces of cloth.
Cut the cloth following the outside edges (dashed lines) of each pattern piece.
Lay these pieces aside while you prepare the other pieces.
4. Select a suitable color of fabric for the Teddy's sweater. You will need two pieces each about 12 by 5 inches.
Place the two pieces of fabric right sides together.
Pin the sweater pattern piece to the two pieces of cloth.
Cut the cloth following the outside edges of the pattern piece.
Lay these pieces aside while you prepare the pants.
5. Select a suitable fabric for the pants. You will need two pieces each about 8 by 5 inches.
Place the two pieces of fabric right sides together.
Pin the pants pattern piece to the two pieces of cloth.
Cut the cloth following the outside edges of the pattern piece.
Lay these pieces aside to be used in the following steps.
6. Take one of the pieces of fabric that was cut for the head and place it right side to right side with one of the pieces that was cut for the sweater. Position the two pieces so that the bottom of the head and the top of the sweater are aligned. (Note: One of the pieces will be upside down with respect to the other piece. Furthermore, the curve of the two pieces will not match. The head/neck piece will have to be gathered to match the sweater/neck piece.)
Sew the two pieces together 3/8ths of an inch in from the aligned edges.
Repeat the above procedure for the other head and sweater pieces.
7. Join a head/sweater piece to a pants piece.
Take one of the head/sweater pieces and place it right side to right side with one of the pants pieces. Position the two pieces so that the bottom edge of the sweater piece is aligned with the top edge of the pants piece.
Sew the two pieces together 3/8ths of an inch in from the aligned edges.
Repeat the above procedure for the other head/sweater and pants pieces.
8. Next, attach the hands and feet pieces to the head/sweater/pants pieces.
Position one of the hand pieces right side to right side with one of the sweater arms. Align the bottom edge of the sleeve with the top edge of the hand.
Sew the two pieces together 3/8ths of an inch in from the aligned edges.
Repeat the above procedure to attach a hand piece to the other sleeve.
The feet are attached to the legs of the pants in a manner similar that that used for attaching the hands to the sweater.
9. You now have two completed pieces for the Teddy Bear.
With an iron, press down the seams that have been sewn.
On one of these pieces, sew on two buttons for the eyes. Another button can be used for the nose (You can embroider the nose if you want.) and a mouth can either be embroidered on or it can be made using a marking pen.
IMPORTANT note: If the Teddy is for a very young child, do NOT use buttons. A small child might get a button detached and stuck in its throat!
10. With one of the pieces decorated with a face, you are now ready to assemble the Teddy.
Place the two pieces right sides together.
Sew around the Teddy leaving the part between the ears open. (when sewing, make a 3/8ths inch seam allowance.)
The Teddy is then turned right side out by passing the body through the opening at the top of the head.
11. Stuff the the Teddy.
Fill the Teddy with the stuffing material. It is best to use small pieces of filling (especially in the arms and legs,) because that will fill the Teddy better.
12. After filling the body, (including the ears,) you will be ready to close the opening in the head.
Turn in the seam allowance on each side of the head and baste it to hold it in place.
Now hand sew the the opening together joining the two folds together.
Remove the basting.
Your Teddy is complete!
Note: The arms and legs have small diameters so they can be gripped by small hands. Frequently, small children carry their stuffed animals by the ears.