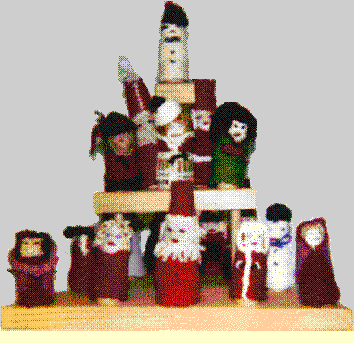
You can make tapestry dolls like these using simple, available materials.
The size of the loom can be varied from the one shown.

If you prefer to use metric measurements, go to metric
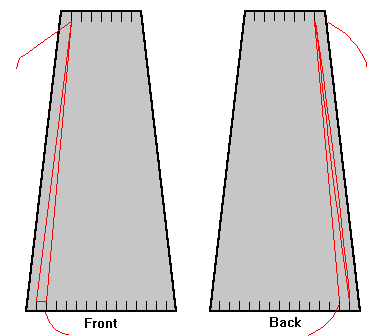
Cut a strip of cardboard that is 3 inches wide.
Draw a line from the bottom left corner of this piece of cardboard to a point that is 7/16 inch from the upper left corner of the cardboard.
Draw another line that is 1 7/8 inches from the bottom left corner to a point that is 1 7/16 inches from the upper left corner.
Cut along the two lines to make the basic loom shape.
Make 1/8 inch vertical marks along the top and bottom edges at 1/8 inch intervals. When completed, you should have 7 marks along the top edge and 14 marks along the bottom edge.
Cut the cardboard at each mark so that you have slits about 1/8 inch long.
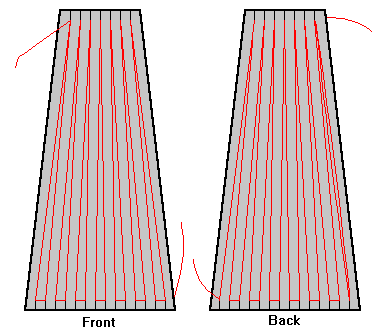
Putting the long threads on a loom is called "warping." The long threads are called the "warp." In this project, we will use sewing thread for the warp. This example shows red thread, but that color was chosen just for contrast. (You can experiment with different weights of threads such as button thread. If you are already a weaver, you may have some 10/2 yarn that would be suitable.)
You can warp your loom directly from a spool. By using thread from a spool, you do not have to pre-measure the length of the warp. Allow an inch or two tail at the beginning and end of the warp (see illustration.) These loose ends may be tucked inside the doll when you have finished weaving.
Start as follows:
Note that it is important that the back now has three warp threads and the front has only two warp threads.
Now continue warping as follows:
If you need explicit directions for the rest of the warp, look at detailed directions.
When you have finished, the front and back of the loom should look like the following figure.
Now you are ready to start weaving. An easy doll to start with is a snowman. For this example, use white sport yarn. (You may use knitting worsted, but the lighter weight sport yarn is probably more satisfactory. Also, you may wish to use white thread for the warp instead of the red that is shown.) The yarn you use to weave with is called the "weft."
Take a length of your weft yarn and thread it through your yarn needle. (To weave a doll all in one color requires a length of weft of over 3 yards. You may find this an unwieldy length to weave with. You can always use a shorter length, and when you have woven it all in, you can continue with another length of weft. The ends of all weft lengths can be hidden inside of the doll.)
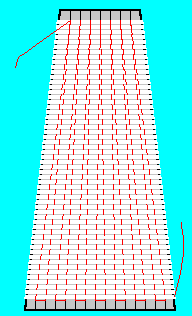
Starting at the top of the loom, use the needle to weave over the first warp thread, under the second, over the third, etc. across the front. When you reach the other side, pull the yarn needle and most of the weft yarn through the warp, leaving a small tail extending on the left side.
Turn the loom over, and weave across the back, going over and under all the way across the back. Pull the needle and weft through the warp and draw it up snug. You have now completed one full turn around the doll. On each turn, push the weft upwards so that it is packed in tightly. (Note that when you warped the loom, it was important that you have an even number of warp threads on one side and an odd number on the other side.) After completing one turn, your over-under sequence ends with an "over".
Turn the loom over to the front side. Weave as before, but now you go under-over, etc. Continue weaving around and around until you fill the entire loom. The direction you weave is not important. You can weave left-to-right or you can weave right-to-left.
When finished, the loom should look something like this:
Now you can remove the doll from the loom and put on some finishing touches. Note that when you warped the loom you made horizontal loops across the bottom. To remove the doll, you must pull each loop (front and back) down over the bottom of the loom. (It may be necessary to bend the cardboard between slits to get a loop free.) When removed, the doll will be open at the bottom and closed at the top. Hide any loose weft ends and any loose warp ends inside of the doll. Using a yarn needle and appropriately colored yarn, you can add facial and other features to the doll. For example, using black yarn push the needle from the inside of the doll out where you want an eye; then back in and out again for the other eye; then back in again and out for the nose; and then back in again to hide the end of the yarn. Using red yarn, you can stitch on a mouth in a similar manner. You can take some yarn (perhaps braided) and make a sash for your snowman. When finshed, he might look something like this:

How you decorate the doll is only limited by your imagination. You might use fabric paint, beads, felt pieces, etc.
To make a more detailed doll, you can use different colored yarns for the hair, face, collar, blouse, and skirt. An example is shown in figure 6.
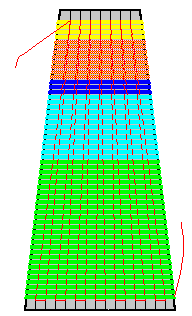
You may want to use other colors. These were chosen to give contrast between the elements.
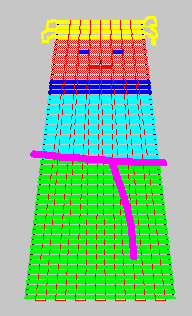
You may finish the doll as before, but in this example, you may want to add some curls around the head. A suggested finishing is shown in figure 7.
After making a few dolls on the loom described, experiment with other sizes of looms and other materials.
Other suggestions:
You may find it desirable to stuff the head or the entire doll with cotton.
You can use the dolls as finger puppets.
Have fun!
Return to Bob Stuff Craft Two page.