
This project is rated as EASY to INTERMEDIATE.
Supplies - computer paper (or card stock), scissors, pencil with eraser, straight pin, glue, (optionally: two small beads, crayons or other coloring tools)
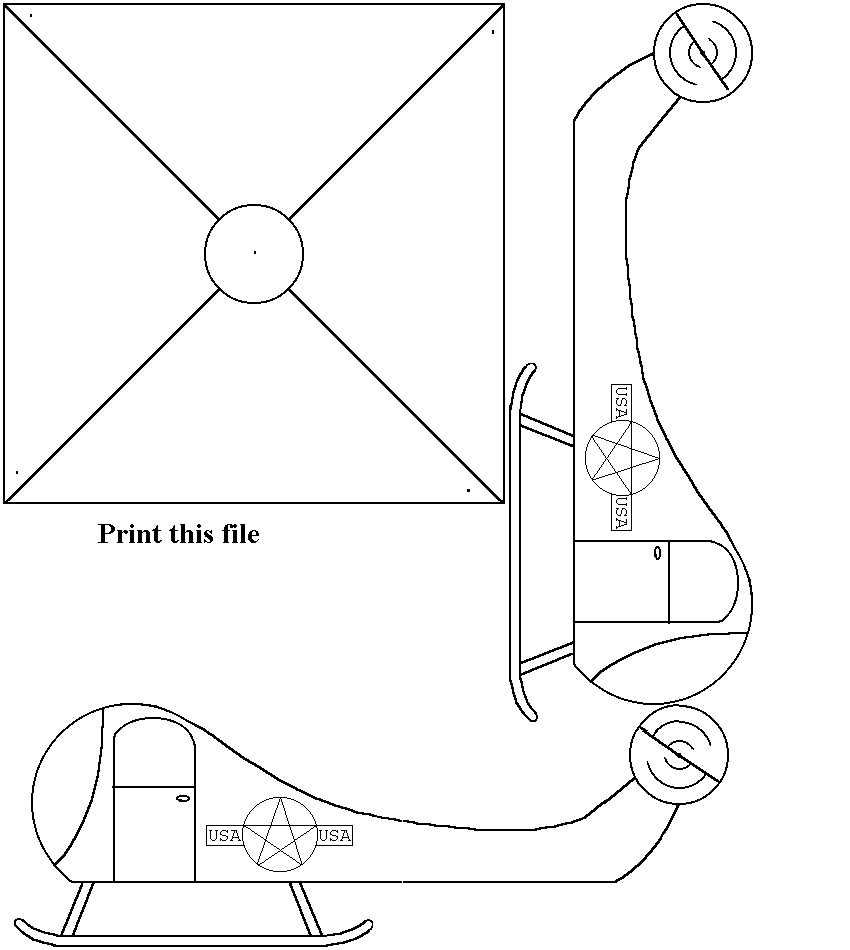
How to make the helicopter -
First, go to drawing and print it.
Then return to this document for more instructions.
Here is a one-half size preview of the project printout.

(Before making your first helicopter, you may want to experiment by making just a pinwheel. See the EASY project at the end of this document.)
First, we must prepare the pencil.
Cut off the top of the pencil to a length of 3 inches including the eraser. (You may have to get help from someone who can do this with a saw or knife, or you may have an old pencil that is about the right length. If you have one that is a
little too long, sharpen it until it is short enough.)
Color the helicopter body parts any way that you want (Optional.)
Cut out each side of the helicopter. (Do not cut out the part between the struts that support the landing skids; that part is needed for strength.)
Put some glue on the pencil and glue it to one side of the helicopter (printed side down)
Position the pencil so that it is centered on the back edge of the door and extends about 3/4 inch above the body of the helicopter. Allow your glue to set for awhile.
After the glue is set enough so the pencil doesn't slide around, take the other side of the helicopter; place it with the printed side down; then apply glue to that entire body NOT including the landing gear (you should do this on a sheet of newspaper or something to keep from getting glue on your table.)
Carefully align the side with the glue on it (glue side down) over the other side and press them together. You will have to do some forming around the pencil so each side bulges out equally.
Allow time for the glue to dry. Then bend each landing skid outward so your helicopter can stand on them.
Now it is time to assemble the rotor.
Cut out the rotor (the square at the top of the page.)
Cut along the diagonal lines from each corner into the circle (don't cut into the circle!)
Using a pin, punch a hole in the central dot and in each of the four other dots.
Place the pin through the central hole of the rotor.
Then, take one of the corners with a hole in it and curl (don't fold) it under the rotor and place it on the pin.
Curl each of the other 3 corners with holes under the rotor and place each one on the pin.
Now, push the pin vertically into the top of the eraser.
(Note: The order of assembly of the rotor for the helicopter is different from that for the pinwheel.)
Now your helicopter is ready to "fly." Hold it as high as you can above the floor and let it drop. The rotor should spin as it falls. If the rotor does not spin freely, it may help to place a small bead on the pin before
assembling the rotor and another bead on the pin before you insert it in the eraser. If the rotor hits any part of the body, you may not have gotten the pencil positioned high enough. You can't adjust that; but, if possible, you can add another bead above the eraser to hold the rotor up higher. If that doesn't work, you will have to make another helicopter and position the pencil so that it projects up higher.
You may also want to put designs on the rotor and see how they look as the rotor spins.
You may want to draw a pilot inside the helicopter's front bubble.
Cut out the rotor as described above and make holes at each of the 5 dots.
Place the pin through one of the corner holes; curl (don't fold) that corner toward the center of the rotor; then curl the next corner inward and place it over the pin; curl each of the other two corners in and place them on the pin also.
Now place the pin through the central hole of the rotor.
Now, holding the pencil in one hand, push the pin into the SIDE of the eraser.
You now have a pin wheel. Hold the pin wheel in your hand and swish it around. Your pin wheel should rotate on the pin.
(Hints: Your rotor may rub against the pencil and not rotate freely. You can do one of two things to overcome this.
http://www.auntannie.com/castoaks