
This project will show you how to make a stuffed toy that is a ghost.
This project is rated as:
Materials needed: cloth, sewing machine (could be done by hand, but would be more difficult), scissors, printer (preferably a color ink jet), computer paper, filler (stuffing material), optionally: marking pens and heat transfer paper.
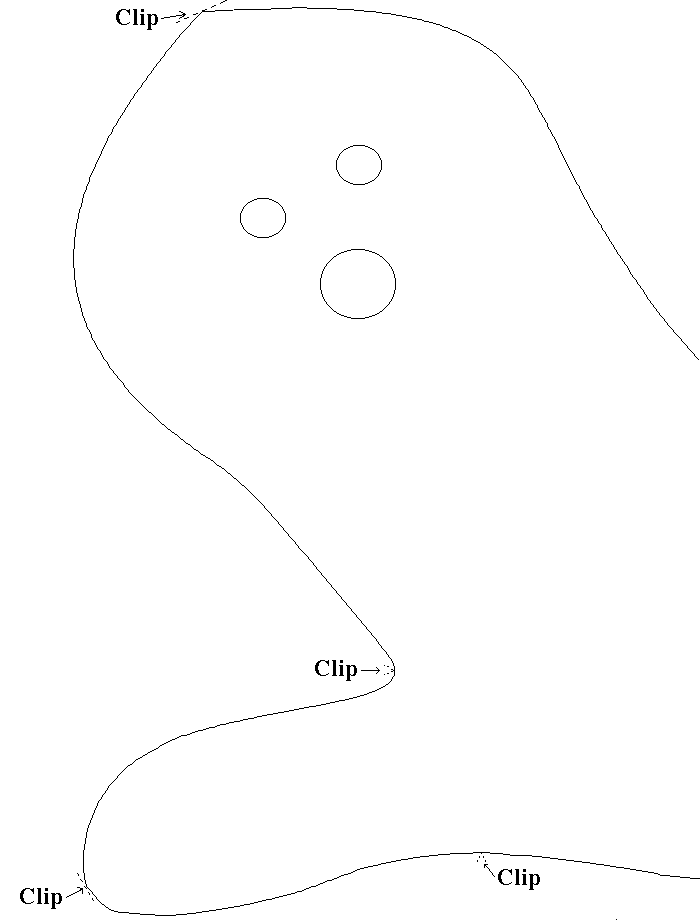
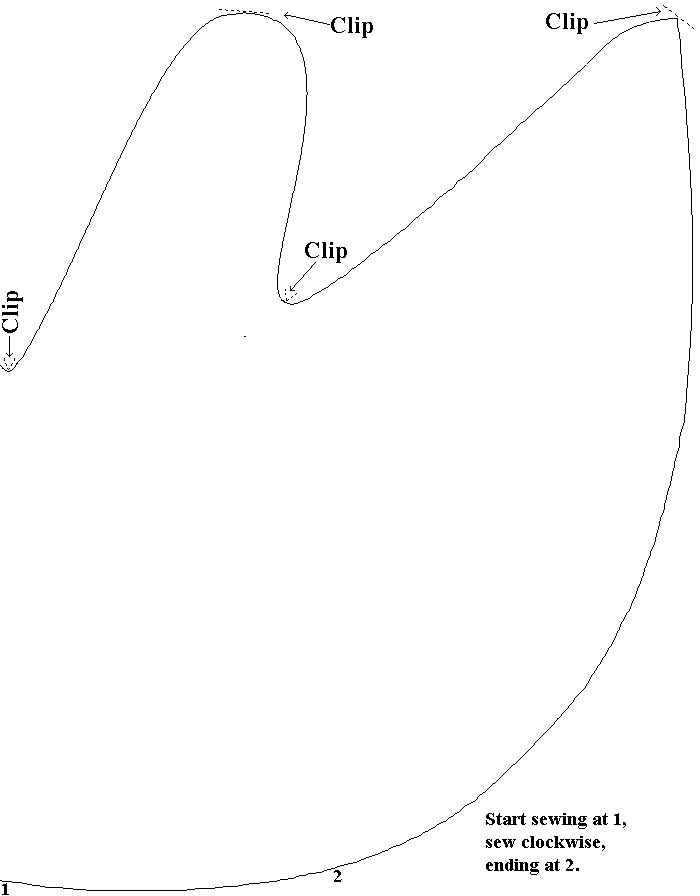
Due to the limitations imposed by the size of printer paper, it is necessary to make the toy pattern in two pieces.
First, print the left side of the pattern.
Then, print the right side of the pattern.
(Note: MacIntosh users will find the printouts to be too large to fit on a page. It is suggested that MacIntosh users copy the graphics by right clicking on the image, save to a file, and then print from a graphics package to re-size the printout.)
Trim the right edge of the left side of the pattern so that the edges of the pattern are at the edge of the paper. Then, join the left side to the right side by laying the left side on the right side and aligning the pattern outline so it is continuous from one page to the other. Secure the pages together with transparent tape.
(Note: If you would like to make a larger toy, you can have the pattern enlarged at a copy center. Some copy centers have copiers that can print on 17" by 22" paper.)
The pattern that you have printed shows only the seam line and some suggested facial features. The simplest procedure is:
1. Select some fabric (you will probably want to use white.)
2. Fold the fabric so that you have two layers the size of the pattern and that they are placed so they are right-side to right-side.
3. Pin the pattern to the two layers of fabric.
4. To provide a seam allowance, cut around the pattern at a distance of about one-quarter of an inch from the outline.
5. Remove the pattern from the cloth and pin the two layers of material together (keep the edges of both pieces aligned.)
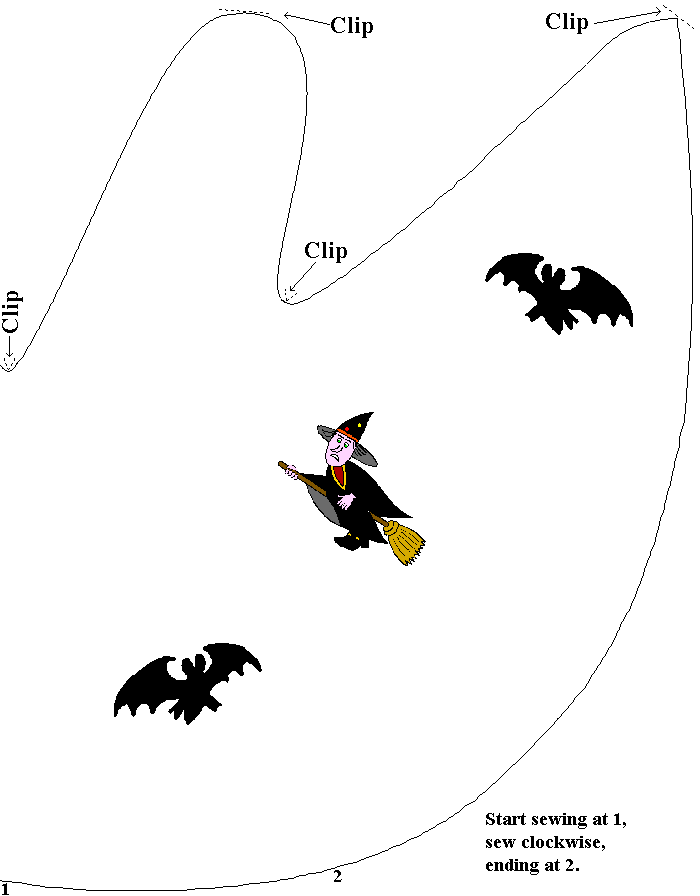
6. Sew the two pieces together. (Allow about one-quarter inch for a seam allowance. Start sewing at point "1" shown on the pattern; sew in a clockwise direction around the fabric and end at point "2" marked on the pattern. It is a good idea to back stitch at the beginning and end to reinforce the seam.)
7. Where there are curves in the seam, cut a small "V" in the seam allowance that has the point almost at the stitching. Where there are points, cut across the point so that the point of the stitching is close to the cut edge. These places are marked on the pattern.
8. The purpose for not stitching all the way around is to provide an opening. Turn the ghost right side out by passing it through the opening.
9. When you have the ghost turned, you may proceed to stuffing it with some suitable filler.
10. When you have the ghost stuffed, close the opening by hand sewing the edges together.
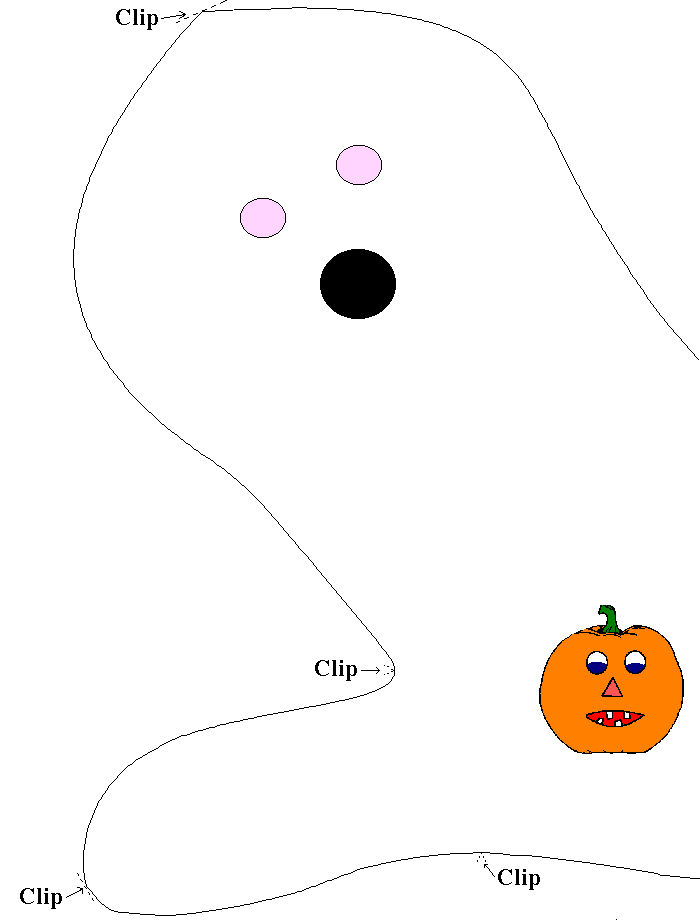
The procedure described will yield a plain ghost. If you wish to add eyes and a mouth, you can draw them on using a marking pen. It may be more convenient to do this on one layer of the fabric. When you remove the pattern from the cut cloth (step 5), lift up one piece, draw on it, and then place it back down so your drawing is on the inside facing the other piece.
If you have a color ink jet printer, there are other options for decorating your ghost.
Instead of printing the left and right parts of the pattern as above in black on white, print the colored patterns pieces: color left and color right.
These color pattern pieces must be printed on special transfer paper. Follow the directions that come with your transfer paper to transfer the ink to the fabric. Do this only on one piece of fabric. Cut around that piece as described in step 4. Then lay that piece, face down, on a second piece of fabric and pin them together. Cut the second piece of fabric by following the outline of the first piece. Complete the toy as given in steps 6 through 10.
The procedure just described has 2 drawbacks. One, it requires that you use 2 pieces of transfer paper. Second, there will be a lot of empty areas and the transfer paper may leave some undesirable residue on the cloth.
Another method requires a little more work, but gives more satisfactory results. Print some objects on your transfer paper. In this method, you will print enough objects for about three ghosts on a single sheet of transfer paper.
Cut out the objects you want to use (eyes, mouth, etc.) from the transfer paper. When you cut them out, it is not necessary cut exactly along the outline; a little white space will not cause a big problem. However, it is recommended that on each piece you cut so that there is a small tab about one quarter inch wide and a half inch long. The little tab is to be folded up so that you have a "handle" to hold the object while you press it onto the fabric. It also provides a grip so that you can easily remove the paper, leaving the ink on the fabric.
After step 5, transfer the objects to one piece of fabric. In this procedure, you decide which objects to use and where to place them. Then place the fabric so the objects face the other piece and continue the following steps.
This project will provide a child with a Halloween toy that can be used every Halloween and maybe some days in between.