This project is rated as slightly more difficult than average because you will need to use some wood working tools.
Materials and tools needed: Computer paper, wood, paint, sand paper, metal rod, scissors, jigsaw, drill
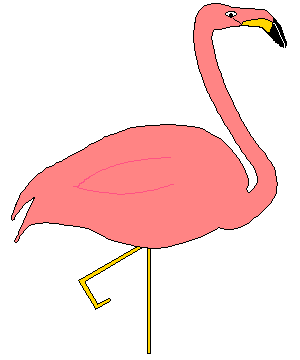
You will make a Pink Flamingo similar to the one shown here:

Click here to see the flamingo pattern.
Print the pattern. This pattern was sized so that it will fit on an 8.5"x11" sheet of computer paper. If you want to make a larger (or smaller) flamingo, you may position your mouse cursor on the pattern and click the right mouse button. Your browser should give you the option of saving the image to a file. After you have it in a file, you can load it into a graphics program and re-size it there and print it. If you make it larger, your graphics program will print it on 2 or more sheets of paper. You can then tape the pieces together to make a large pattern.
After you have printed the pattern, cut it out around the outside outline.
It is recommended that you use 3/4" thick exterior grade plywood for your bird. You can use other material for your bird, but you should pick material that will be sufficiently strong and be capable of withstanding weather out of doors. Lay the pattern on the plywood (or other) and trace the outline onto the wood.
Using a suitable cutting tool (a jigsaw for wood), cut out the bird.
Two pieces of metal rod (1/4" diameter) are needed for the legs. They should each be about one foot in length for the size bird that is illustrated. Leave one leg straight and bend the other one as shown in the illustration. Drill 2 holes in the bottom edge of the bird. Make one of them vertical and the other at an angle as shown. Drill each hole about 2" deep.
Insert the legs into the holes. If they do not fit tightly, use some water-proof glue to secure them.
Sand the edges of the wood.
Paint the flamingo as suggested in the picture. Start by first applying an all-weather primer to the wood and then use the decorative colors.
When the paint is dry, you can put your new lawn ornament in your yard.
Return to Bob Stuff Craft Two page.